 Science Daily: Uranus
- New images reveal what Neptune and Uranus really look like January 5, 2024
- Ringing in the holidays with ringed planet Uranus December 19, 2023
Science Daily: Pluto
- How Pluto got its heart April 15, 2024
- Evidence of geothermal activity within icy dwarf planets February 15, 2024
Science Daily: Kuiper Belt
- How Pluto got its heart April 15, 2024
- Evidence of geothermal activity within icy dwarf planets February 15, 2024
A few months ago, I read an article in The Physics Teacher (published by the American Association of Physics Teachers) on measuring the speed of sound using a couple of microphones hooked up to a computer’s line-in jack. Apart from having to make a trip to Radio Shack to buy some parts to convert two standard unpowered microphones into a pair of powered microphones for stereo input, the process was amazingly straightforward. I did a quick proof-of-concept in the dining room one evening and got a speed quite close to the accepted value of around 342 m/s. My 10 year-old son was so fascinated he wanted to do this as a science project. Of course, I immediately made it more difficult by asking him to expand on the idea.
The speed of sound is not constant, not even in air. There are several things which affect it, but the biggest seems to be the temperature. So, my son’s project was to determine how the speed of sound changes with temperature. Okay, I admit, I thought it was pretty cool, too. He’s already put together his poster and entered it in the science fair as PS102, so I’m going to describe the setup in a little more detail and show the results here.
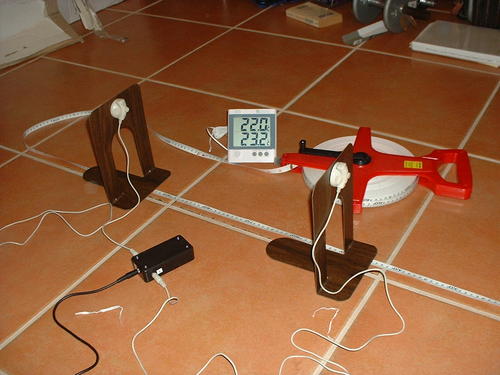
The basic idea is simple. Record the temperature. Set up two microphones spaced a few meters apart, walk around so you and the two microphones are in a straight line. Make a sudden, sharp noise, recording it on the computer. Measure the time difference between when the sound is detected in one microphone compared to the other. Speed is just distance divided by time, so you’re done.

Well, not quite. If you want a more accurate measure, you repeat the experiment using different spacing between the microphone then fit the measurements to a straight line. The idea is that you really don’t know if the electronics introduce some bias in one microphone vs the other, but if it does, then measuring at different distances will let you remove it by doing the line fit. You could also just swap the microphones and average the two measurements, but doing the line fit to several distances lets you also come up with an error estimate.
I did not have my 10 year-old do error estimates. I didn’t even have him try to understand (except in a very general conceptual fashion) how the line fit is done. The very general idea (that I explained to him) is that you want a line which passes as close as possible to all of the points. Since there are sources of inaccurancies in the measurement, they might not all lie perfectly on the line. Here are the sources of inaccuracy that he came up with:
- Temperature measurement is only good to about 0.5ºC.
- The wind was sometimes blowing when we were outside. Never much, but a little puff of air might make a difference.
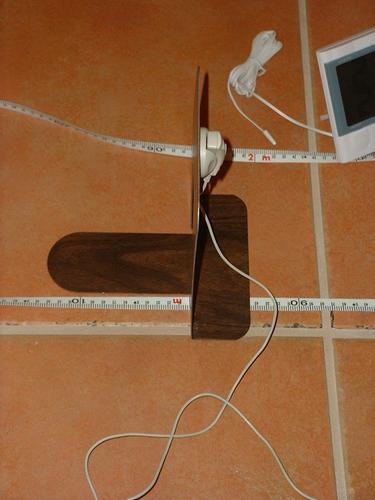
- The microphone stands were just book-ends and they might not have been standing straight up. Since we measured distance along the ground, we might have been wrong by a few millimeters on each end. Sometimes the book ends were sitting on snow and ice, so they could easily have been crooked.
- It wasn’t always easy to tell what to choose as the start of the sound in each microphone when looking at the computer screen. This could have made a small difference of a few samples (2-3), which amounts to about 0.04-0.06 milliseconds (very small).
I thought that was a pretty good list. In any event, you don’t have to know how to do a linear least squares line fit to come up with a speed measurement from the raw data. Once you have your list of distance vs time measurements for a given temperature, put them in a spreadsheet and ask the spreadsheet for the line slope. This will do the job for you, no real math needed. Once you have all of your speeds at various temperatures, set up another page in the spreadsheet with the speed and temperature measurements and have the spreadsheet calculate the slope of that line. Presto, you’ve got the amount the speed of sound changes with the temperature.
Here is a not-quite typical view from Audacity, which is what we used to acquire the data. Audacity conveniently runs on both Mac and Linux (and Windows, too, if you care which I don’t). Version 2 of Audacity does not read out time separations in milliseconds like version 1 does. Instead, you read out the separation in samples and convert (48,000 samples/second for our setup). This had the disadvantage of requiring that I spend a little more time explaining the idea to Matthew, but he grasped the idea almost immediately. Converting between units (samples to seconds, seconds to milliseconds, whatever) isn’t quite second nature to him at this stage, but he did quite well. This particular measurement showed clipping (the red parts) where the sound went off scale due to the microphone gain being set too high. In spite of that, it was possible to get a good time measurement when zoomed in because there was no clipping in the first few oscillations.
[img_assist|nid=836|title=Typical Two-Microphone Measurement with Significant Clipping|desc=|link=node|align=center|width=500|height=307]
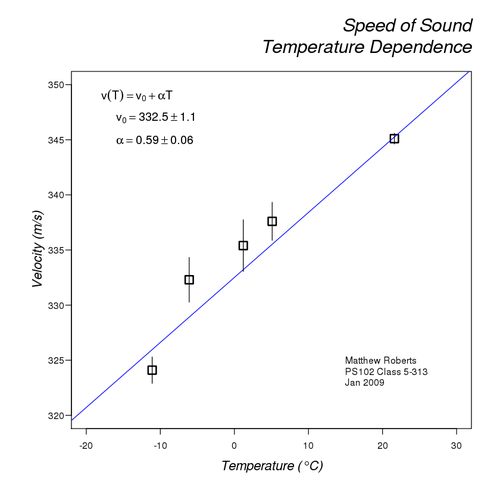
Satisfyingly, the measurement was very close to the accepted value of 0.6 (m/s)/ºC. Actually, it was surprisingly close, but that is at least in part luck. We made 5 measurements and all but one were done outdoors in the cold. I’ll show the plot below where you will see that our errors are largest for the outdoor measurements. Surprise! We got sloppy in the cold. Something about freezing your hands trying to use the laptop touchpad makes you rush a little.
For the record, the accepted value for the speed of sound in the temperature range 0-100ºC is
v = 331 m/s + 0.6 (m/s)/ºC.
Our measurement was
v = 332 m/s + 0.6 (m/s)/ºC
The plot below shows the results along with the errors. Matthew’s analysis showed a slightly different result since it did not include an error analysis or a weighted fit. The slope was indistinguishably different, but the intercept (speed a 0ºC) came out at 333 m/s. You may already have everything you need to try this yourself!
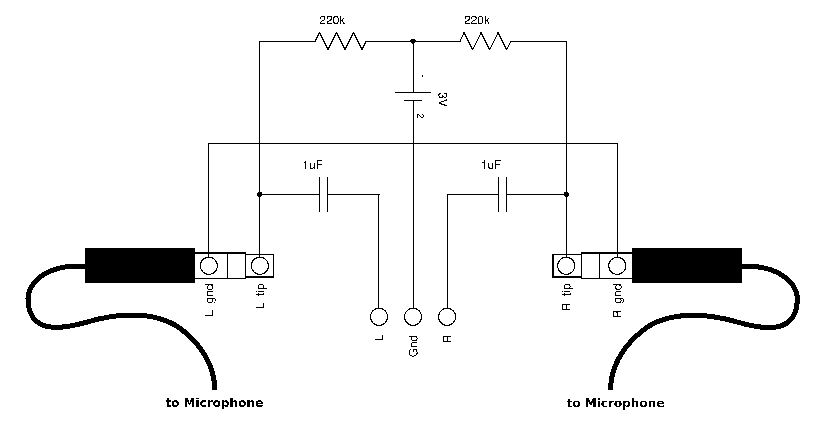
Here is a schematic of the circuit for converting two el-cheapo microphones to a powered line-in for your computer. I bought two lapel microphones for about $6-7 each. The other parts were from Radio Shack. Click through for a larger image and more details.